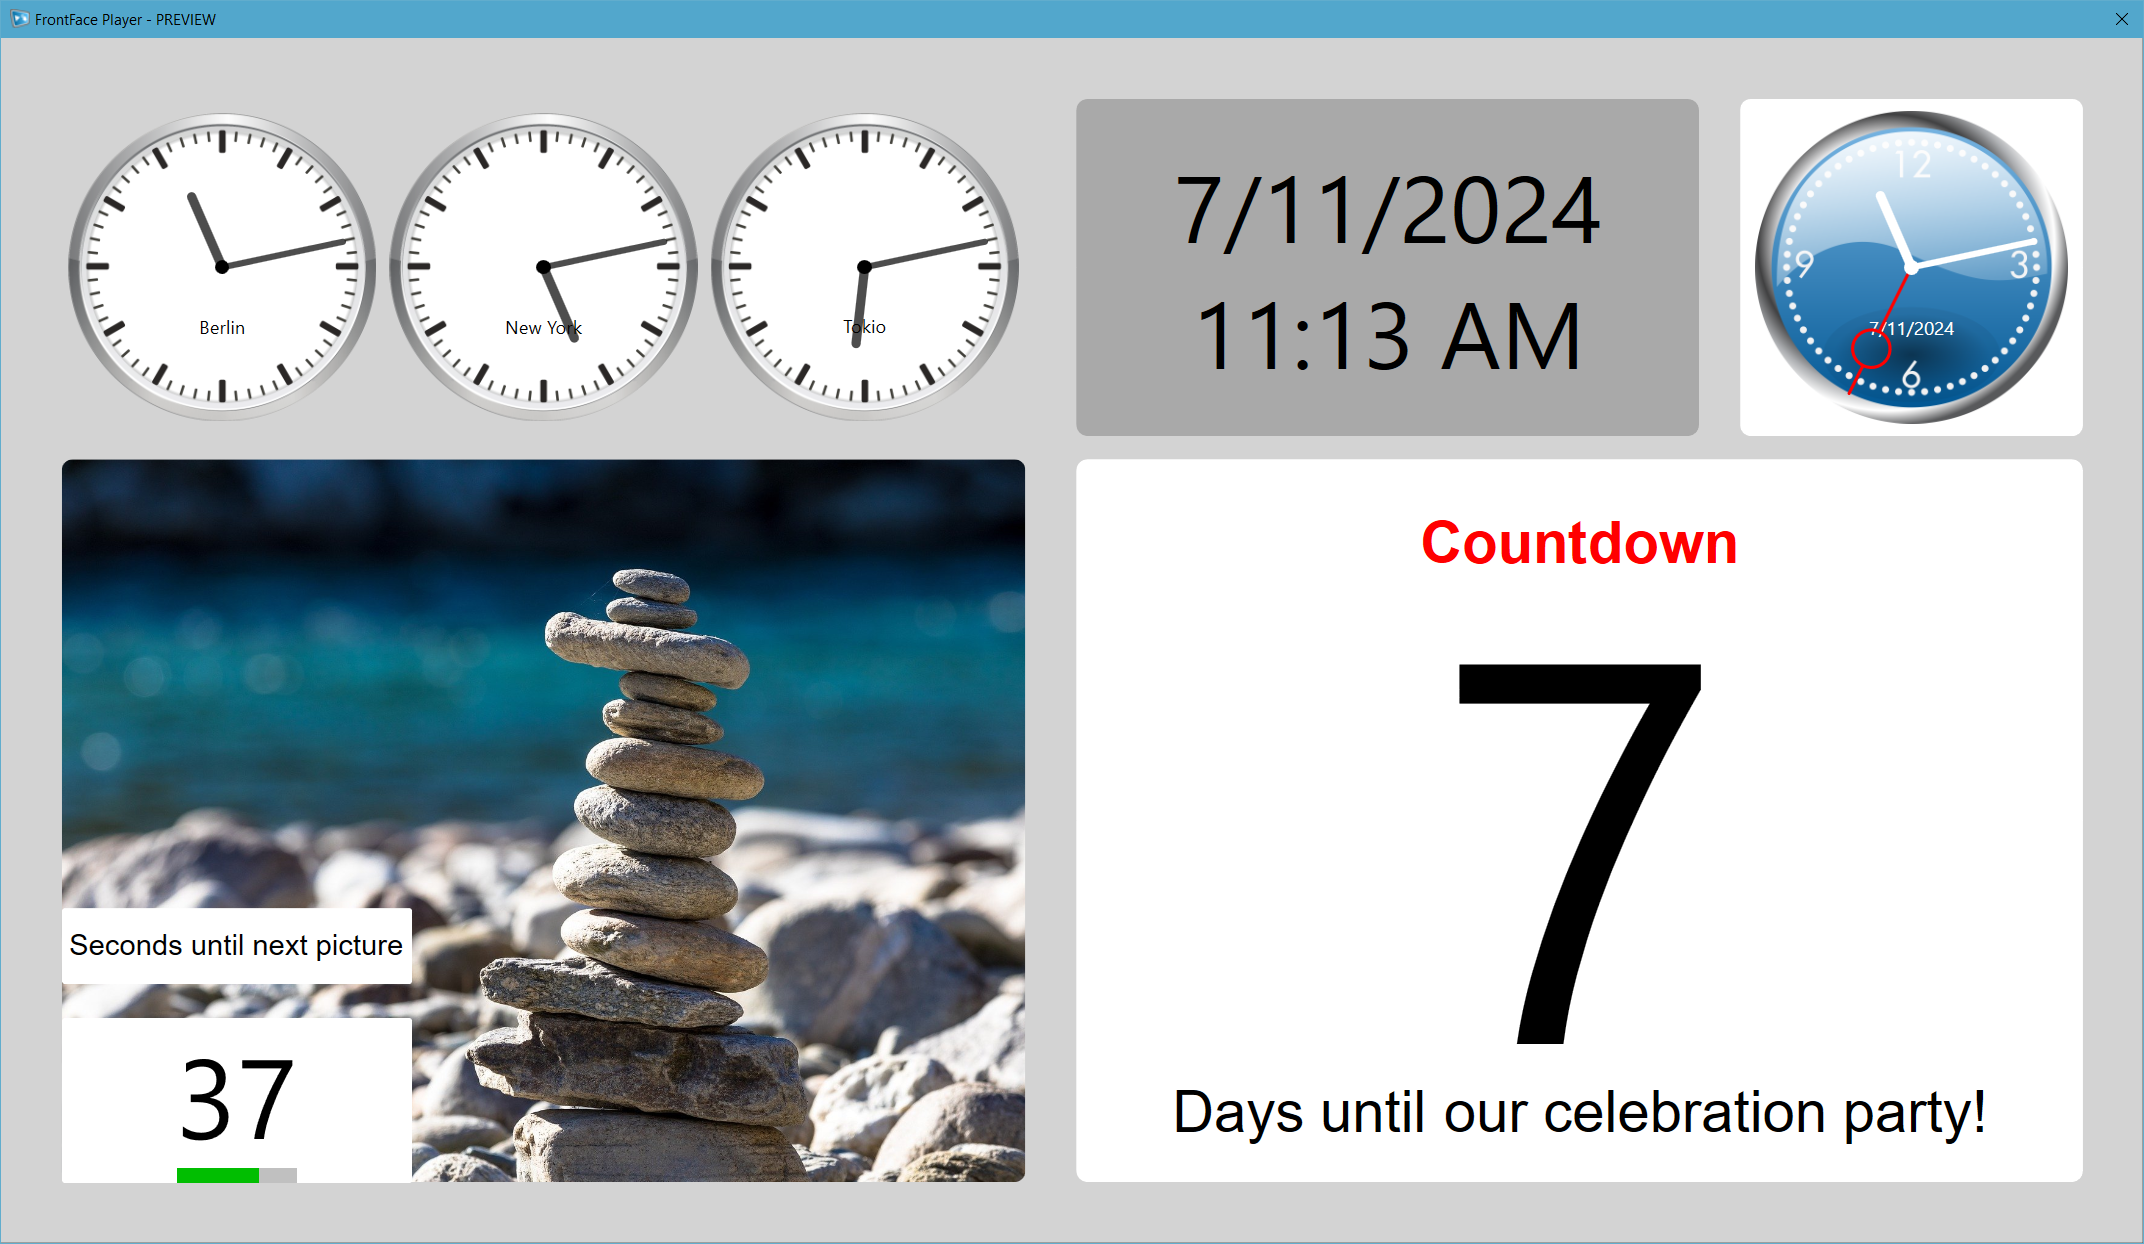
Digital Signage with Android or Windows: Which is better?

Digital signage software is available for various operating systems. Broadly speaking, there are two types of systems used for digital signage: PC-based and SOC (System on a Chip). While PC-based systems use classic PC hardware, usually based on x86 or x64 processors, SOC hardware has the entire system on a chip and is usually integrated directly into the screen. However, there are also external SOC media players and sticks that connect to the display via HDMI or Display Port like PCs.

Accordingly, PC operating systems are used on PC hardware: In addition to Windows as the top dog, Linux in its many forms also plays a role in some cases.

SOCs, on the other hand, have a variety of proprietary operating systems that are usually closely tied to the hardware and come directly from the hardware manufacturer. On the other hand, there are also many SOCs that are based on Android or Android TV. The reason for this is that Android is a very common and robust operating system, which is also available free of charge (as it is open source), making it an interesting option for many hardware manufacturers.

In summary, both Windows and Android have a leading role to play in the digital signage sector. This raises the question:

Which operating system is better suited for digital signage?

First of all: There is no clear answer to this question! As is often the case, it depends on individual circumstances.

Windows

The advantage of Windows-based systems is clearly the variety of hardware and the ability to easily replace individual components if needed. In addition, managing Windows-based devices is much easier if you already manage Windows workstation PCs. The update security argument is also compelling in the case of Windows, as updates are available for many years. However, when it comes to hardware performance, Windows systems offer more choice and modularity. A Windows-based player system can be configured to meet both performance requirements and budget. Mini-PC systems or Slide-In PCs (OPS), which can be integrated either behind or directly into the display, are particularly popular for digital signage appliances. The disadvantage is that in most cases the operating system (Windows) has to be purchased separately, which means additional costs. Some systems, especially those based on Windows IoT Enterprise, come with the Windows operating system pre-installed.

Android

On the other hand, there are player systems based on Android or Android TV. Their main advantage is the price. In the case of Android TV, the necessary hardware is already integrated into the display and does not need to be purchased separately. External set-top boxes are also available for very little money and are priced well below the cheapest PC systems. The performance of these devices, which are specifically designed for multimedia applications, is usually very impressive. However, one disadvantage should not be overlooked: update security! Since security and feature updates are not released centrally by Google, but by the respective device manufacturers, it is often the case, especially with Android boxes from the Far East, that updates are no longer offered after a very short time.

Decide for what?

So the choice depends on the purpose of the digital signage application and the available budget. For tight budgets, isolated solutions or smaller applications (e.g. a digital menu or a simple reception screen), Android is definitely worth more than a look! But when it comes to more professional applications with demanding requirements and where sustainability, maintainability and flexibility are paramount, there is usually no way around Windows.

But no matter which platform you choose, the FrontFace digital signage software is available for both Windows and Android. Functionally there are some differences (the most important being that the Android version of FrontFace does not support interactive applications), but with FrontFace you get an extremely powerful yet easy to use digital signage software that can even be used to manage mixed systems that use both Android and Windows players.

Scheduled startup and shutdown of digital signage PCs running Windows

Not all digital signage systems need to run 24/7. In many cases, there are windows of time when such systems are not needed, or even when they are not allowed to operate due to legal requirements.

To avoid the manual effort of turning systems on and off, they can be started and shut down automatically and time-controlled. We show you how this works!

First of all, you have to distinguish between the display and the player PC: Most professional displays and LFDs offer a function to switch the screen on and off, often even with a weekly program (e.g., for different times on the weekend). This is usually set up through the OSD (On Screen Display) of the device. However, displays (like conventional TVs) that do not have such a feature can often automatically go into standby mode when there is no video source, and wake up when the video signal is available again. The easiest way to control such displays is to start and shut down the connected player PC. In any case it is better to avoid rough methods such as the use of timer adapter plugs, as this can lead to permanent damage to the screen.

The final method of starting and shutting down the connected player PC depends on the capabilities of the hardware used: Some PCs have a function in the BIOS or UEFI that can be used to define automatic boot times. The advantage of this is that it is very reliable and works even when the PC is completely turned off (as long as the AC is not unplugged!). For example, the popular Intel NUC Mini-PCs have such a BIOS (Aptio® V UEFI firmware core).

Settings for automatic power on in the BIOS/UEFI

However, if such a function is not available, the automatic start can still be accomplished using the Windows built-in tools and the hibernation function. This is done by defining a timer in the Windows Task Scheduler (TASKSCHD.MSC) that will restart the PC at the desired time. If the PC wasn’t shut down before, but was put to hibernate (again, the PC is effectively turned off!), the timer can still cause the PC to wake up at the desired time and then trigger a restart, so that a cleanly restarted PC is running at the desired time.

On most PCs, hibernation must first be enabled in the Windows power options (e.g. with the command line: powercfg /h on).

The timed shutdown of a Windows PC can also be implemented using a timer in the Windows Task Scheduler. The only thing to consider is whether the PC should actually be shut down (in the case of automatic startup via the BIOS/UEFI) or only put into hibernation mode (in the case of automatic startup via the Windows Task Scheduler).

If you find it too complicated to set up a scheduled startup and shutdown, you can also use the free FrontFace Lockdown Tool. This way you can easily set up the above functions. Another advantage is that you can also use the FrontFace Lockdown Tool to configure other features such as the automatic login of a user account without entering a password or the start of a predefined application such as the FrontFace Player App.

Settings for automatic shutdown, reboot and hibernate in the FrontFace Lockdown Tool

By the way: Even if the FrontFace Lockdown Tool can only be used to define a fixed time for startup or shutdown: The FrontFace Lockdown Tool actually only creates timers in the Windows Task Scheduler, which can be adjusted afterwards. For example, you can define different times for certain days or the weekend.

FrontFace on the Amazon Fire TV Stick

The FrontFace digital signage software is not only available for Windows, but also for the Android operating system. In addition to tablets, media player boxes and mini PCs with Android as well as TVs with integrated Android TV, the compact Fire TV Stick from Amazon can also be used as player hardware. The multimedia stick from Amazon is particularly suitable for small, budget-sensitive standalone installations. In addition to the normal model, there is also a 4K version, which offers a higher resolution, and a Lite version, which is completely sufficient for digital signage purposes.

A few steps are required to install FrontFace on a Fire TV Stick. Since the stick only has a single micro-USB port, which is required for connecting the included power supply unit, a so-called USB-OTG Y-adapter cable with a micro-USB 2.0 connector and USB socket type A is recommended, at least for installation. This allows to connect a USB stick or a keyboard in addition to the power supply.

Fire TV Stick with USB-OTG-Y cable attached

First, a file manager app from the “appstore” must be installed on the Fire TV after the regular setup process of the device has been completed. The free app “File Explorer” is recommended here.

The File Explorer app must then be allowed to install apps from unknown sources so that FrontFace can be installed via “sideload”. To do this, go to “Settings” > “My Fire TV” > “Developer Options” > “Install Unknown Apps”. Then select the “On” option for the “File Explorer” app.

Now a USB stick with the APK file of the FrontFace software must be inserted (you can download the APK file directly from the FrontFace Assistant in the “Players” menu). The APK file is then installed on the Fire TV Stick using the File Explorer app.

After the installation is complete, start the FrontFace Player App from the menu of the Fire TV Stick.

FrontFace Player App setup

Next, FrontFace needs to be set up: The publishing folder must be selected in accordance with the publishing method used. In most cases, the “Web Server” publishing method is the best choice. You then need to specify the URL of a web server where the content is published to using the FrontFace Assistant. The FrontFace Player App then automatically fetches the new content from that source over the Internet.

Finally, the option to start FrontFace automatically when the Fire TV Stick is switched on can be activated if this is desired. By clicking on “Start Player” the setup is complete and the FrontFace Player App will display the published content on the screen and update itself automatically once new content has been published.

If you want to try out FrontFace on the Fire TV Stick by yourself, simply download the free trial version from the FrontFce product homepage!

Integration of Excel, Word and PowerPoint in FrontFace Playlists with Office 365 and SharePoint

If you work a lot with Office documents (Word, Excel, PowerPoint) and eventually, even use SharePoint as your intranet platform, there is often an inevitable need to integrate such files also in digital signage playlists or on interactive kiosk terminals.

When working with FrontFace, there are different ways how such an integration can be done:

1.) Integration as PDF, Print2Screen or Video

In this case, the Office files are converted into another format or exported with the respective desktop applications so that they can be displayed directly in FrontFace. As an alternative to exporting PDF documents, the Print2Screen function by FrontFace can also be used. This often gives better results in regards to display quality. In the case of PowerPoint presentations, you can either create page-by-page exports as PDF or Print2Screen, or export as video. This has the advantage that all animations and cross-fading effects from PowerPoint are fully retained. You should make sure that you always create an MP4 file and not use the old WMV format, since WMV files are significantly larger and often of poorer quality.

Export of a PowerPoint file as video

2.) Integration Using the Native Desktop Apps

FrontFace also enables the direct integration of EXE files in playlists and touch menus via the media object “External Application”. This way, the Office applications can be directly integrated and the file to be opened can be set in command line. A list of the available command line parameters of the Office applications can be found at Microsoft. The command line parameters allow, e.g. a PowerPoint presentation to be started directly.

Settings dialog of the “Externeal Application” media object in FrontFace

However, this type of integration has some disadvantages: First of all, the Office applications must be installed on the player PC and an Office license must be available. Furthermore, security concerns can also play a role, since users with access to the system could change the files and at the same time gain access to the file system of the player PC, for example in the “Open File” dialog. Furthermore, you should also keep in mind that FrontFace starts and exits an external application here, over which there is otherwise no further control. Therefore, a direct integration of native desktop apps is only a sensible choice in a few cases.

3.) Integration via Office 365 / SharePoint as Web Page

If the Office files to be displayed are hosted on Office 365 (OneDrive or SharePoint), there is another, very elegant way for integration: As a web page in FrontFace. To do this, the file (Word, Excel or PowerPoint) must first be stored in a SharePoint document library or on OneDrive. A sharing link can then be created using the “Share” function. It is important that the “Allow editing” option is deactivated here (if desired) and otherwise the “Anyone” and “No password” sharing options are selected.

Sharing Dialog of OneDrive / SharePoint

If you now open the link created in this way in a browser, the file appears in the respective online version of the Office application:

How an Excel file is displayed in Excel Online in the browser

Often, however, only the display of the file contents itself is desired and therefore the display with the menu ribbon of the Office application is not what you want. Do adjust this, an additional parameter has to be appended to the URL which is:

&action=embedview

This ensures that only the document is displayed and nothing else. There are a few other parameters that can be used for certain Office applications:

ParameterFunctionSupported Office Application
&action=embedviewEnabled the “full screen display” of the document without the GUI of the Office online applicationAll
&wdAllowInteractivity=FalsePrevent InteractionsExcel
&wdHideGridlines=TrueHide grid linesExcel
&wdHideHeaders=TrueHide column headingsExcel
&AllowTyping=TrueAllow entries in calculating cellsExcel
&ActiveCell=’Tabelle1′!F19Cell to be initially displayed / activeExcel
&wdDownloadButton=FalseHide download buttonPowerPoint
&wdPrint=0Prevent printingWord
&wdEmbedCode=0Prevent emedding codesWord
&wdStartOn=1Page to be shown initiallyWord

Excel file integrated in a FrontFace playlist together with other media objects

Which of the methods presented here for integrating Office documents in FrontFace playlists and touch menus you use ultimately depends on the particular use case and the basic conditions.

How to Integrate a Scrolling News Ticker into your Touch Menu!

How about making the home page of your touch menu livelier and more interesting? By displaying a scrolling news ticker tape with news headlines (RSS feed) or with your own news (custom text), you can do this easily with FrontFace. Just open the settings dialog of your touch menu:

Then click on the selection arrow below “Menu Layout” on the right…

…and select the “Main Menu with Ticker” layout. This layout already contains an additional container above the lower toolbar, which is pre-assigned with a news ticker.

After you have selected that layout, you can open the ticker settings dialog by clicking on the container with the ticker.

Many options for individually adjusting the ticker are available here. In addition to the displayed content (RSS feed or free text), you can also customize the visual design, such as colors, font and the scrolling speed.

You can either enter the messages line by line as custom text or enter the path/URL of an RSS feed or a plain text file either on a web server (via HTTP) or on a file server (UNC file path). If you provide an RSS or plain text file as a source, you can also set the “feed update interval” in minutes. After the specified time, the feed is retrieved again. In the meantime, a cached version is being used.

The appearance of the ticker can be tailored to your needs in terms of scrolling speed, colors, fonts, etc. You can also specify a title (prefix) that remains static in front of the scrolling text. For languages like Hebrew or Arabic, you can also change the scrolling direction of the ticker.

Finally, use the preview button of the FrontFace Assistant to check the results:

Touch Menus: Back to Home Page & Digital Signage Screen Saver

In this tutorial we will show you two very helpful features for your interactive touch menus with FrontFace: The “Back to Home Page” function automatically returns the menu to the start page if a user leaves the terminal without clicking “Home” button on leaving. With the screen saver feature, you can supply your kiosk terminal with additional, moving content when there is no interaction and usage.

Back to Home Page

When a user leaves the terminal without returning to the start page of the touch menu, a certain period of minutes can be defined after which the system automatically returns to the top level menu of the touch menu when there is no more interaction.

To configure this setting, open the settings dialog of the touch menu:

Here is the “Interaction Timeout” setting. Set the desired duration (e.g. 15 minutes). This ensures that the menu returns to the start page after 15 minutes without interaction.

As a result, a subsequent user can start the navigation directly from the main menu level (“Home Screen”) and does not have to manually click the “Home” button first.

Digital Signage Screensaver

Especially for interactive systems such as kiosk terminals, it is desirable to display appealing, moving content on the screen (e.g. advertising or specific calls for action) when the system is not being used interactively. You can easily create an individual screen saver with FrontFace:

First create a playlist (in addition to your touch menu), which will serve as screen saver.

Here you can insert any media objects, for example pictures, videos, slideshows, web pages or texts. In addition, with the help of a suitable screen layout, you can also add static overlay text or even scrolling text with a call for action (CFA) such as “Tap here for more information …” or “Please touch the screen!”.

Then switch to the “Scheduling” section in the Assistant and activate the “Advanced Scheduling”. Then click on the + icon in the “Event Sources” list to create a new event source.

Click on “Install a new event source plugin” and select the plugin file for the screensaver. This is named “Screensaver.ffapx” and is located in the “C:\Program Files\mirabyte\FrontFace\Plugins\” folder.

After installing the plugin, select it and click OK.

Finally, you specify the number of minutes and the previously created playlist as a screen saver: